The search magnifying glass

produced some helpful results
PVC,
Thanks for the tip on searching the forum for posts about the feedback manager. I did read the posts that came up with the search and think that I have some sense of what the feedback manager is but would still like to hear from someone (an audiologist perhaps?) who is familiar with that feature as it applies to the Oticon OPN 1 hearing aids.
I have run the feedback manager using the Genie 2 software but what I don’t know is how that then affects the programming of the OPNs.
PVC,
Thanks again for your help. That whitepaper from Oticon was excellent and just what I needed to help understand why the feedback analyzer should be run. Probably the key part of the paper for me was this:
"It is crucial to perform this analysis at every new fitting and every time the acoustic properties of the hearing aid change (dome type, ear wax) or there is an update to the audiogram."
So basically they are saying that you should run the analyzer every time you make any changes to your programming because it then calibrates the anti-feedback system (AFBS) which enables the AFBS to monitor accurately situations where feedback might occur and then take measures to eliminate it.
For others who might be reading this, what I did when I ran the feedback analyzer was to connect my aids to the Genie 2 program in the fitting section of the software. Then while wearing the aids I clicked on “Feedback Analyzer” and then on the “Start” button. What then happens is that a noise is generated in both aids for 10 seconds which enables the Genie software to determine if any feedback is occurring. After the 10 seconds the noise stops and a graph is displayed for each aid (left and right) showing the feedback margin and insertion gain levels (these terms are defined in the white paper). That’s all there is to it.
Note: There is a background noise level indicator on the feedback analyzer screen - if the background noise where you are located is above the red line then you should take action to reduce the noise (close the door, window etc.).
Ok, I have another Genie 2 programming question. In Genie 2 under the “Client” section there is a tab labeled “Audiogram”. Here you can input the information from a person’s audiogram. There are three buttons labeled “AC”, “BC” and “UCL”. Can anyone shed some light on what these labels stand for any which one(s) should be used to input audiogram information? (The Genie 2 help screen for this doesn’t give any info on what these mean.)
I have entered my audiogram data using the AC option but that is just a guess and I don’t really know if it is correct.
AC - Air Conduction
BC - Bone Conduction
UCL - Uncomfortable Level
How would fitting software use Bone Conduction (BC) audiogram results?
Ok, now I understand.
So am I correct that I just enter the numbers from my audiogram as air conduction (AC)?
Thanks again.
I received conflicting information about running the feedback analyzer for the Genie 2 software on the OPN. Obviously this white paper says that you should run it every time something changes. I did have my audi run it on my OPN1 originally when I was fitted with 85dB receivers on bass dome with single vent fitting. And that was because I experienced feedback if I didn’t run it.
HOWEVER, if you go on audiologyonline.com and viewed one of the Oticon seminars on Genie2 programming, the presenter said that if there’s no feedback issue, they don’t encourage the feedback analyzer to be run and have feedback control turned on because it’ll take away some of the headroom gain which is one of the trade-offs of using the feedback analyzer.
When I mentioned this on this forum, one of the fitters who frequents the forum (maybe Um_bongo and Neville) said that this is old advice and the new advice from Oticon is to run it always.
Then when I recently changed my fitting with 105dB receivers using custom hard acrylic molds (still has a vent in it), I asked my audi about running the feedback analyzer again (because the new setup wiped away the old settings) and she asked if I experience any feedback. I said actually no I don’t (maybe the custom molds help in this regard, so she said that if I don’t have any feedback issue then she doesn’t want to run the feedback analyzer and enable feedback control, for the very same reason cited by the Oticon seminar I mentioned above, because it would require the tradeoff of losing some headroom if enabled.
I think that makes sense. If you have feedback issue then by all means run the feedback analyzer and enable feedback control. But if it’s not an issue then why run it?
That’s what I generally do. But, this question is beyond my pay grade ![]()
The different AC/BC results mean certain things to your Audiologist. Scroll down to How to interpret Bone Conduction (BC) or Air Conduction (AC) Hearing Loss on an Audiogram in this link.
Ok, that makes sense. If I am interpreting that correctly I have just sensorineural hearing loss so the numbers from my audiogram should be recorded at AC values on the Genie 2 audiogram input screen.
Thanks again - you are a fountain of knowledge. I feel like I am making progress on understanding some of the features of the Genie 2 software.
Volusiano,
Thanks for your info on using the feedback analyzer. In my case I really don’t have any feedback problems and am using an open dome as well so using the feedback analyzer doesn’t pose any problems for me. Sounds like in your case there are some more considerations. The graphs from the analyzer for my case show that I have lots of “head room” so I guess I don’t have to worry about it.
My next question about using the Genie 2 software has to do with the different graph displays available in the fine-tuning part of the fitting display.
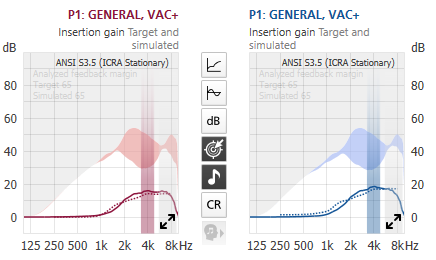
The graph that is displayed initially is titled "Insertion gain Target and simulated" and looks like this:
I would like to know just what these graphs are telling me and would appreciate any info that anyone can provide.
It’s the amount of extra oomph applied per frequency. The dotted line is the target, the solid line is the actual gain of the aid into a standardised coupler, which may differ from your ear.
Um_bongo,
Thanks for the info on the graph - now I am beginning to understand it.
Can you tell me what the portions of the graph shaded in red and blue represent?
For those 2 swordfishes in your graph, they are the Analysed (Dutch spelling, I guess) Feedback Margin. If you hover the mouse over it, it tells you. You can turn the graph off with the musical note, and you’ll see what your gain would be without any feedback control. But with feedback control on, for the high frequencies where feedback occurs, the gain may be lower than maximum according to a complex algorithm and may be as low as the bottom edge of your fish.
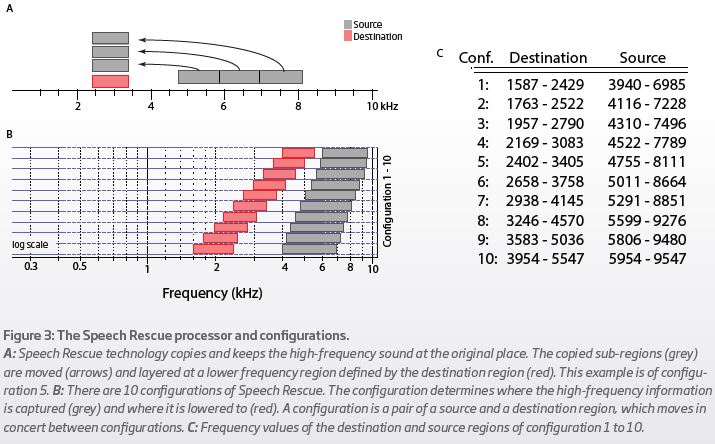
If you mean the vertical colored bands, those are the destination frequencies of the Speech Rescue function. The vertical gray band, which in your graph is all the way to the right, shows the source frequencies for Speech Rescue.
TRY,
Thank you for that information. That really helps me to understand what those graphs are telling me. I think that I am slowly making progress in understanding how to program my aids.
You might have noticed, too, that there are up to 10 different Speech Rescue configurations (see table below). I don’t know how it comes to pick which configuration based on your hearing profile, but it looks like it picked configuration 8 or 9 for you. In my case it picked configuration 1 for my left ear but configuration 9 for my right ear. That resulted in hearing the lowered sounds differently to me. So I manually changed the right ear setting to configuration 1 to match with my left ear setting. You can definitely try different configuration and see which one you like the best. I like configuration 1 the best because that’s the lowest destination band I can set where I can hear the lowered sounds the most clearly.
SAVING THE HISTORY OF DIFFERENT SETTING SETS IN GENIE2
I like to save the settings sets for various experiments with my OPNs, so that can always go back to them, but there is no File/Save As feature—no built-in way to save the previous state of the aids or a snapshot of a session once you start that session. However there is a simple work-around that I’d like to share, and this work-around simply involves copying a client and renaming it appropriately before connecting to the aids.
As DIYers, most will have only one real client, ourselves, but we can use Genie2’s database of clients to hold many different setting sets for that same client. Assuming you already have one client entered, copy it via the exporting and then importing processes found as drop down choices in the top horizontal menu choice Genie. That’s Genie/Export Selected Client Files. Give it the temporary file a name (or accept the default “SelectedClients.nhax”). Then click Genie/Import Client Files, and point to that file.
At that point, you will have two instances of that one dataset shown as two clients with identical names. (It does not add a (1) at the end like Windows does for duplicate files.) Next edit the client and rename the last name and/or first name in a way to indicate the date or the purpose of the session, f.g. “9-6-17, added Speech Rescue to P3”.
After that, detect or connect to the aids and make your intended changes. If you ultimately make more changes than planned, after ending the fitting, disconnect and edit the client name again to reflect a proper description.
If desired, you easily build several experiments to test before you even get your MiniPro out of the box, and try them all out in the same hook-up session.
I just use a unique session name within the same client name. For example, Client=pvc, Session=(pvc Original Settings). Start the fitting, get the settings from database, or from the hearing aids, make no changes during the fitting, then at the end save the settings into the database (with no changes) into Session name= (pvc Original Settings) or whatever session name you choose.
This is what I can’t seem to do. I’ve got Genie2 open (but I’m not hooked up, presently), amd I don’t see or recall any opportunity to save into a new session name. My client list does have a column for last session, but it is automatically populated with date and time. Is this perhaps a NOAH option, and do you have NOAH?